Piano Roll in FL Studio: A Guide to Melodies and Chords
If you’re learning music production in FL Studio, one of the first creative tools you’ll encounter is the Piano Roll. This powerful feature is where melodies, harmonies, and chord progressions are shaped into tracks. While FL Studio offers many ways to sequence notes, the Piano Roll stands out for its precision, flexibility, and creative depth. Whether you’re a beginner making your first beat or an advanced producer experimenting with complex arrangements, mastering the Piano Roll is essential.
In this guide, we’ll explore the Piano Roll in detail—covering how it works, how to create melodies and chords, essential tools, and pro tips to improve your workflow. By the end, you’ll have the knowledge to transform simple ideas into polished compositions inside FL Studio.
What Is the Piano Roll in FL Studio?
The Piano Roll is a visual grid editor that allows you to program melodies, chords, and rhythms with precision. Each note is represented as a rectangle placed on a timeline, aligned to a virtual keyboard on the left side. The vertical axis represents pitch, while the horizontal axis represents time.
Instead of playing notes live with a MIDI keyboard, you can use the Piano Roll to draw, edit, and manipulate notes directly. This makes it perfect for composing even if you don’t play an instrument.

Why the Piano Roll Is Essential?
- Flexibility: Easily edit, move, and resize notes to create variations.
- Visualization: Clear grid view helps visualize chords, melodies, and scales.
- Advanced Tools: Includes quantization, strumming, arpeggiators, and ghost notes.
- Precision: Adjust note velocity, length, and placement for professional results.
For producers, the Piano Roll isn’t just a composition tool—it’s the creative canvas where ideas turn into structured songs.
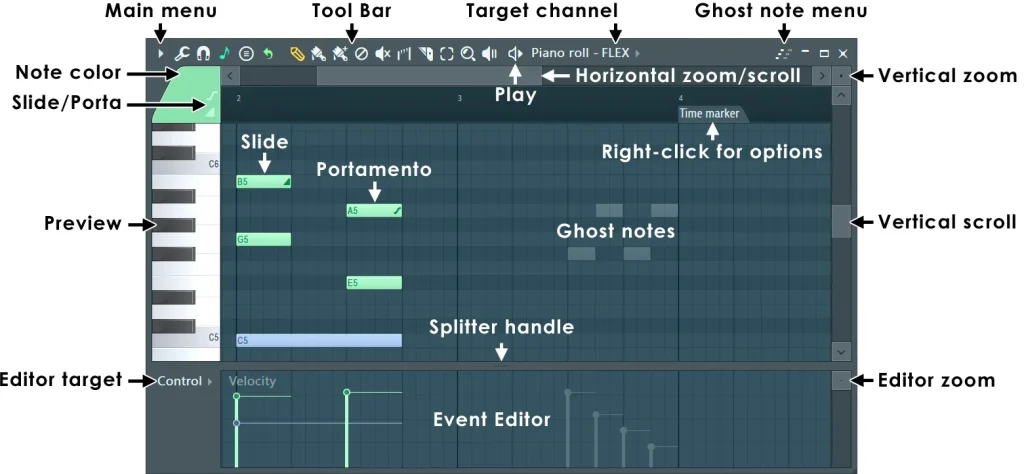
Understanding the Piano Roll Interface
Before jumping into melodies and chords, it’s important to understand the interface.
The Grid
The grid is divided into beats and bars. Depending on your snap settings, you can work with full beats, half-beats, or smaller subdivisions like 1/16 or 1/32 notes.
Keyboard
On the left side, you’ll see a piano keyboard. Clicking any key plays that pitch, while drawing notes onto the grid assigns them to that pitch.
Toolbar Tools
The toolbar includes:
- Draw Tool (pencil icon) – For adding notes.
- Paint Tool – For repeating notes quickly.
- Delete Tool – Removes notes with a click.
- Slice Tool – Splits longer notes into smaller segments.
- Select Tool – Highlights multiple notes for editing.
Velocity and Note Properties
At the bottom, you’ll find a velocity control area where you can adjust how soft or hard each note is played. This is essential for adding dynamics and realism.

How to Create Melodies in the Piano Roll
Melody writing is often the most creative part of music production. The Piano Roll makes it approachable even for beginners.
Step 1: Choose a Scale
While you can place notes freely, sticking to a scale helps your melody sound cohesive. FL Studio offers scale highlighting via Helpers > Scale Highlighting in the Piano Roll menu. Choose from major, minor, pentatonic, and more.
Step 2: Start Simple
Begin with short, repeating motifs. For example, a four-note phrase can serve as the foundation. Use the Draw Tool to place your notes within the highlighted scale.
Step 3: Build Variations
- Change the note lengths for rhythmic interest.
- Add passing notes for tension and release.
- Experiment with octave jumps for dramatic effect.
Step 4: Adjust Velocity
Varying the velocity of each note makes your melody feel alive. Instead of robotic uniformity, some notes can hit softly while others strike harder.
Step 5: Layer Instruments
You can create counter-melodies by layering a second instrument and using the Piano Roll’s Ghost Notes feature to see your main melody as a reference.
Building Chords in the Piano Roll
Chords form the backbone of harmony in music. The Piano Roll allows easy chord construction and experimentation.
Step 1: Understand Triads
Most chords start as triads—three notes stacked in intervals of a third. For example:
- C major chord = C, E, G
- A minor chord = A, C, E
Step 2: Use Chord Stamp
FL Studio includes a Stamp Tool, which quickly inserts common chords like majors, minors, sevenths, and diminished chords. Access it via Piano Roll > Stamp.
Step 3: Create Progressions
Arrange chords in sequences such as:
- I – V – vi – IV (popular in pop music)
- ii – V – I (common in jazz)
Experiment with inversions (changing which note is lowest) to smooth transitions between chords.
Step 4: Add Rhythmic Movement
Instead of holding long block chords, try:
- Arpeggios – Play notes one at a time.
- Stabs – Short, rhythmic hits.
- Broken Chords – Split notes into patterns.
Step 5: Layer Chords with Melody
Once your chord progression is set, add a melody on top. The harmony will give the melody emotional depth and context.
Advanced Piano Roll Features
Quantization
Align notes perfectly to the grid. Great for tightening rhythms, though adding slight manual offsets can make music feel more natural.
Strum and Flam
- Strum Tool – Offsets note start times to emulate guitar-like strums.
- Flam Tool – Adds quick grace notes before main notes.
Arpeggiator
Automatically converts chords into note patterns, saving time when creating rhythmic sequences.
Ghost Notes
Shows notes from other channels in the background, helping you align melodies with chords or drums.
Note Properties
Right-click a note to access options like pan, release, pitch, and modulation, giving you extra creative control.
Workflow Tips for Speed and Creativity
- Use Shortcuts: For example,
Ctrl + Aselects all notes, whileCtrl + Qquantizes them. - Color Coding: Assign colors to different instruments for clarity.
- Loop Sections: Highlight sections to loop playback while fine-tuning melodies.
- Experiment with Humanization: Slightly shift notes off the grid for a natural feel.
Common Mistakes to Avoid
- Over-quantizing: Too much grid alignment removes the “human” touch.
- Ignoring Velocity: Flat velocities sound robotic.
- Overloading Chords: Stacking too many notes creates muddiness.
- Skipping Scales: Random notes without a scale often sound disjointed.
Why the Piano Roll in FL Studio Stands Out?
While other DAWs like Ableton Live or Logic Pro also offer piano roll editors, FL Studio’s version is praised for:
- Intuitive design.
- Rich set of composition tools.
- Smooth workflow for electronic, hip-hop, and orchestral styles alike.
For many producers, it’s the main reason they choose FL Studio over competitors.
Pro Tips for Crafting Better Melodies and Chords
FAQs
Conclusion
The Piano Roll in FL Studio is more than just a note editor—it’s the creative heart of the DAW. By learning how to craft melodies, build chords, and explore advanced features, producers can unlock endless possibilities. Whether you’re sketching a simple beat or orchestrating a full track, the Piano Roll offers the precision and flexibility to bring your musical ideas to life.