How to Export High Quality Audio in FL Studio in 2026
In the world of music production, FL Studio stands out as a powerful digital audio workstation (DAW) favored by producers, beatmakers, and composers alike. Whether you’re creating beats, full tracks, or sound designs, the final step—exporting your audio—can make or break the quality of your work. Exporting high-quality audio in FL Studio ensures your music sounds professional, retains its dynamic range, and is ready for distribution on platforms like Spotify, YouTube, or even professional mastering services. But how do you achieve that crisp, lossless sound without compromising on file size or compatibility?
This comprehensive guide will walk you through the process of exporting high-quality audio in FL Studio Download, covering everything from basic steps to advanced settings. We’ll explore best practices for formats like WAV and MP3, optimal bit depths, sample rates, and more. By the end, you’ll have the knowledge to render tracks that sound as good as they do in your studio session. If you’re using FL Studio 21 or later versions (as of 2025), you’ll benefit from refined rendering options that enhance efficiency and quality. Let’s dive in and unlock the full potential of your FL Studio exports.
Understanding High Quality Audio in FL Studio
Before jumping into the export process, it’s essential to grasp what “high-quality audio” means in the context of FL Studio. Audio quality is determined by factors like bit depth, sample rate, file format, and rendering algorithms. Bit depth refers to the number of bits used to represent each audio sample—higher bits mean more dynamic range and less noise. For instance, 16-bit is standard for CDs, but 24-bit or 32-bit float offers superior resolution for professional work.
Sample rate, measured in Hz, dictates how many times per second the audio is sampled. The standard 44.1 kHz captures frequencies up to 22 kHz, covering the human hearing range, while 48 kHz is common for video production. FL Studio’s internal mixer operates at 32-bit float precision, which preserves audio fidelity during mixing. However, when exporting, choosing the right settings prevents degradation, such as aliasing (distortion from high frequencies) or compression artifacts.
Lossless formats like WAV or FLAC maintain original quality, unlike lossy ones like MP3, which compress data and can introduce artifacts. For high-quality exports, prioritize lossless options unless file size is a constraint. According to official guidelines, rendering in FL Studio is non-real-time, often yielding better results than live playback due to precise calculations. This understanding sets the foundation for preparing and exporting your project effectively.
Preparing Your Project for Export
Achieving high quality audio starts long before hitting the export button. Proper project preparation ensures your mix translates perfectly to the final file. First, finalize your mix: Balance levels, apply EQ, compression, and effects across the mixer tracks. Use the Master channel for global processing like limiting to prevent clipping—keep peaks below 0 dB to avoid distortion.
Check for any automation clips or patterns that might affect the render. If your project includes external plugins or samples, verify they’re all loaded and functioning without errors. High-quality rendering benefits from enabling “HQ for All Plugins,” which activates high-precision modes in native FL Studio instruments like Harmor or Sytrus, and compatible VSTs.
Set your project’s sample rate in the Audio Settings (F10 > Audio tab). Match it to your intended output—44.1 kHz for music distribution or 48 kHz for film scoring. Also, align the interpolation method in live playback with your export settings to avoid surprises; for example, use 6-point Hermite for quick previews but switch to higher for finals.
Organize your playlist: Ensure the song length is set correctly, with no extraneous silence at the ends. Use markers for loops if needed. If you’re exporting stems (individual tracks), route them to separate mixer channels. Finally, save your project as a .flp file before exporting to have a backup. This preparation phase can prevent common issues like mismatched volumes or missing elements, leading to a polished high-quality export.
Step-by-Step Guide to Exporting High Quality Audio
Now, let’s get to the core: the actual export process in FL Studio. Follow these steps for a seamless, high-fidelity render.
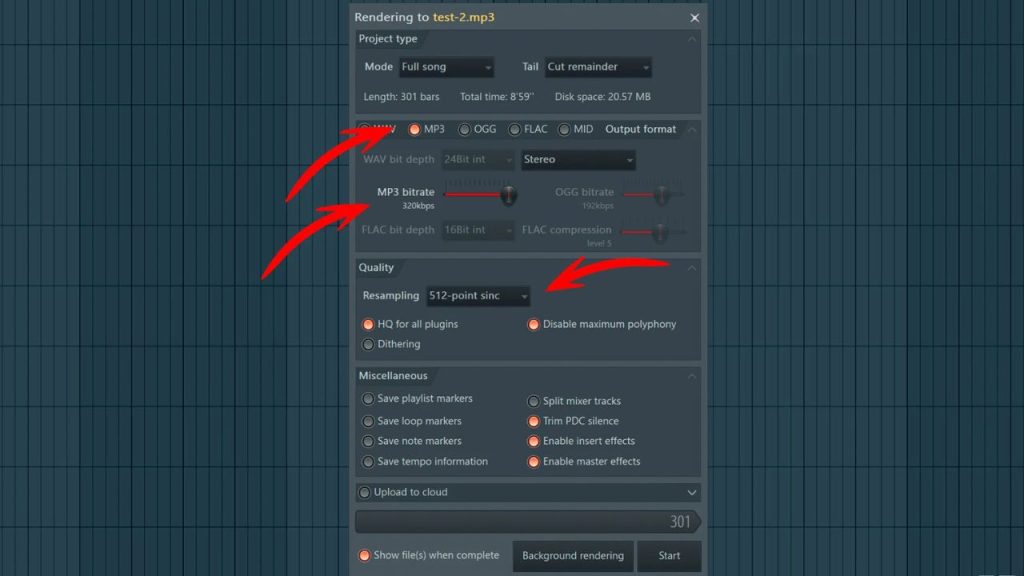
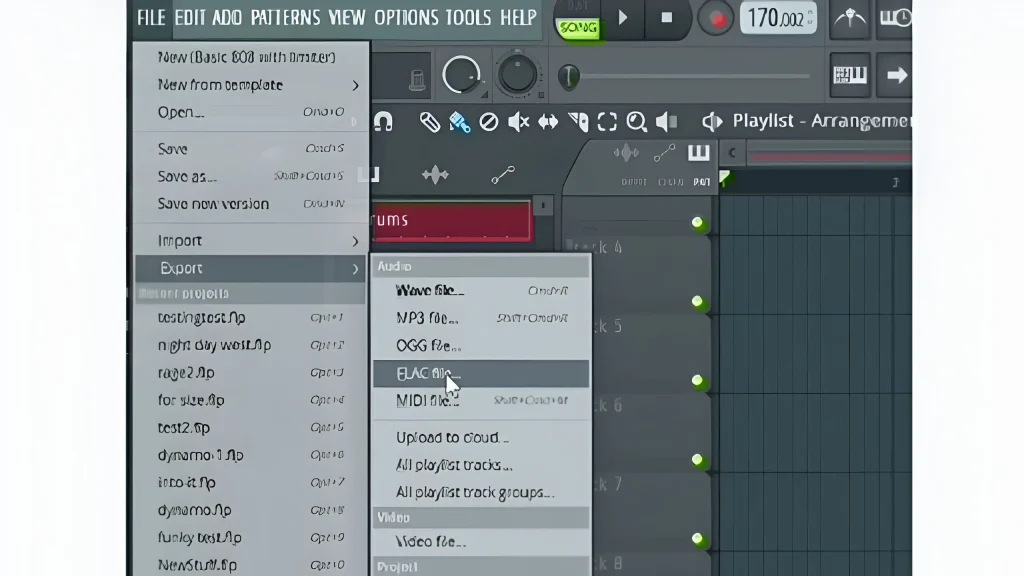
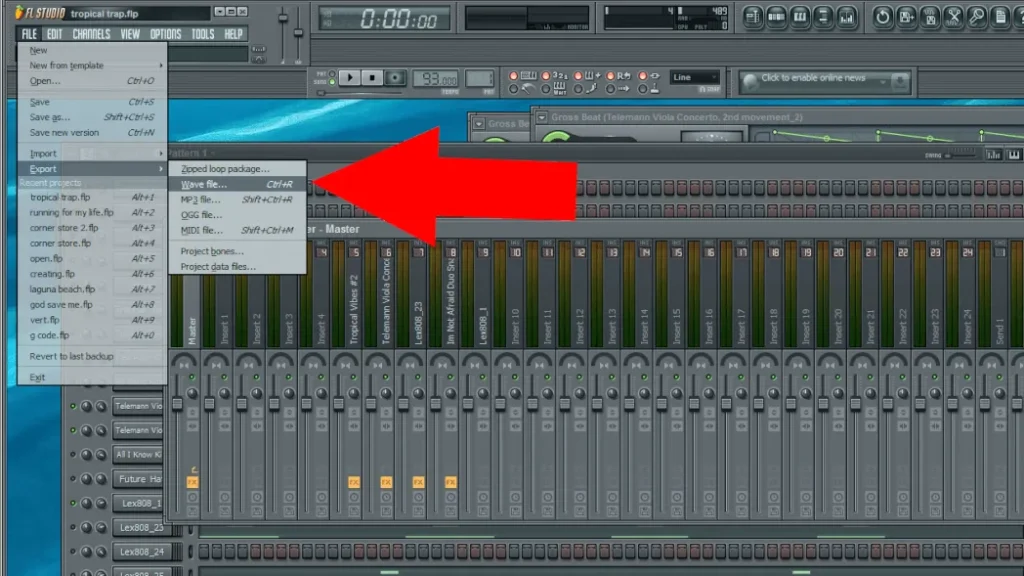
- Access the Export Dialog: Open your project in FL Studio. Go to the top menu, click “File,” and select “Export” > “Wave file…” (or MP3 if needed). This opens the Export Project Dialog, where all magic happens.
- Choose Your Format: For high quality, select WAV as it’s lossless and uncompressed. Options include 16-bit, 24-bit, or 32-bit float. Go with 32-bit float if sending to a mastering engineer, as it preserves headroom and precision. If space is an issue, FLAC offers lossless compression, reducing file size by 20-30% without quality loss. For web sharing, MP3 at 320 kb/s is acceptable but not ideal for archiving.
- Set Rendering Mode and Length: Choose “Song” mode to export the entire playlist or “Pattern” for specific clips. Adjust the length using “Full song,” “Time selection,” or “Beat range.” Enable “Leave remainder” under Tail options to include reverb tails or delays that extend beyond the song’s end—crucial for ambient tracks.
- Configure Quality Settings: In the Miscellaneous section, check “HQ for all plugins” to ensure plugins render at maximum quality. Disable “Maximum polyphony” to ignore voice limits, allowing full instrumentation. For interpolation, select 512-point Sinc for the best anti-aliasing, though it’s slower—ideal for final masters. If exporting to 16-bit, enable dithering to reduce quantization noise by shifting it to inaudible frequencies.
- Sample Rate and Bit Depth: These are tied to your project’s audio settings, but confirm them here. Use 44.1 kHz for standard audio and 24-bit or higher for depth. Avoid resampling unless necessary, as it can introduce artifacts.
- Additional Options: Tick “Enable insert effects” and “Enable master effects” to include all processing. If you want markers for loops or tempo, enable “Save loop markers” or “Save tempo information.” For MP3 exports, set the bitrate to 320 kb/s and quality to high.
- Start the Render: Click “Start.” FL Studio will process the file non-real-time, which might take longer for complex projects but ensures accuracy. Monitor progress; you can abort if needed. Once done, check “Show file(s) when complete” to locate the output.
- Verify the Export: Play the file in a media player or import it back into FL Studio. Compare it to your session—listen for differences in high frequencies or dynamics. If issues arise, tweak settings and re-export.
This step-by-step approach, drawn from official methods, guarantees high-quality results. Users on platforms like Reddit often recommend 24-bit WAV with 512-point Sinc for professional-grade exports.
Advanced Export Settings for Professionals
For seasoned producers, delving into advanced settings can elevate your FL Studio exports. One key feature is the Wrapper settings for third-party plugins—enable “Notify about rendering mode” to let them switch to high-quality offline rendering.
Experiment with higher sample rates like 96 kHz for ultra-detailed captures, but note this increases file size and may not be noticeable on standard playback systems. For dithering, FL Studio uses a shaped algorithm that pushes noise above 10 kHz, making it inaudible—perfect for 16-bit conversions.
In FL Studio 21 and later, enhancements include better M4A support and faster rendering for multi-core systems. If exporting loops, avoid MP3 due to added silence; stick to WAV and use “Trim PDC silence” to remove delay compensation padding.
Batch exporting is handy for stems: Route tracks to separate mixers and use “Split mixer tracks” to render each as individual files. This is invaluable for collaborations. YouTube tutorials often highlight these for mastering workflows, ensuring your audio is ready for external processing.
Common Mistakes and How to Avoid Them
Even experienced users falter during exports. A frequent error is forgetting to enable master effects, resulting in a dry, unprocessed file. Always double-check this box.
Another pitfall is mismatched sample rates—exporting at 44.1 kHz when your project is 48 kHz causes resampling distortion. Set them consistently from the start.
Overlooking interpolation leads to aliasing in high-pitched sounds; default to at least 64-point Sinc for finals. For MP3, low bitrates (below 192 kb/s) introduce audible artifacts—aim for 320 kb/s.
Clipping during render? Your mix is too hot; pull back the master limiter. Finally, not verifying the export can hide issues like missing plugins—always audition the file. Avoiding these ensures pristine audio every time.
Tips for Optimizing Audio Quality Post-Export
To further enhance quality, use external tools like Audacity for analysis or iZotope RX for noise reduction on exports. Store masters in 32-bit float WAV for future-proofing.
For distribution, convert to MP3 only after mastering. Test on multiple systems—car speakers, headphones—to catch anomalies. Community advice suggests rendering minimized to free up CPU for other tasks.
Regularly update FL Studio for bug fixes and improved rendering algorithms.
Conclusion
Exporting high-quality audio in FL Studio is straightforward yet powerful when done right. By preparing your project, following the steps, and leveraging advanced settings, you’ll produce professional-sounding files ready for the world. Whether for streaming, CDs, or collaborations, these techniques ensure your music shines. Start experimenting today—your tracks deserve the best.