How to Add and Manage VST Plugins in FL Studio
In the world of music production, FL Studio stands out as a powerful digital audio workstation (DAW) favored by beginners and professionals alike. One of its most appealing features is the seamless integration with VST plugins, which can elevate your tracks with custom effects, instruments, and tools. If you’re wondering how to add VST plugins in FL Studio or manage VST plugins in FL Studio, this comprehensive guide will walk you through every step. Whether you’re a novice producer or an experienced beatmaker, mastering VST plugins can unlock endless creative possibilities.
VST, short for Virtual Studio Technology, allows third-party developers to create plugins that expand FL Studio’s capabilities beyond its built-in features. From synthesizers and drum machines to reverb effects and mastering tools, these plugins are essential for crafting professional-sounding music. In this 1500-word article, we’ll cover everything from installation to advanced management tips, ensuring your workflow remains efficient and optimized. By the end, you’ll be equipped to enhance your productions effortlessly.
What Are VST Plugins and Why Use Them in FL Studio?
Before diving into how to add and manage VST plugins in FL Studio, it’s crucial to understand what they are. VST plugins are software components that mimic hardware instruments or effects, developed by companies like Native Instruments, Waves, or Serum. They come in various formats, including VST2, VST3, and AU (though FL Studio primarily supports VST formats on Windows and macOS).
These plugins integrate directly into your DAW, allowing real-time processing of audio and MIDI signals. For instance, a VST instrument plugin like Sylenth1 generates sounds, while an effect plugin like FabFilter Pro-Q 3 equalizes your tracks. FL Studio supports both 32-bit and 64-bit plugins, but for optimal performance, stick to 64-bit versions to match the modern DAW architecture.
Why bother with VST plugins? FL Studio’s stock tools are robust, but third-party options offer specialized features. Imagine adding cinematic orchestral sounds with Kontakt or futuristic synths with Massive X—these expand your sonic palette exponentially. According to music production forums, over 80% of producers rely on external plugins for unique textures. Moreover, they foster creativity, enabling genre-specific workflows like trap beats or EDM drops. However, improper management can lead to crashes or cluttered interfaces, which is why learning to add VST plugins in FL Studio and manage them is key.
In terms of compatibility, FL Studio (versions 20 and above) handles VST plugins natively, but always check for updates to avoid conflicts. This foundation sets the stage for a smooth integration process.
Preparing Your System for VST Plugins in FL Studio
To successfully add VST plugins in FL Studio, start with system preparation. Ensure your computer meets FL Studio’s requirements: a multi-core processor, at least 8GB RAM, and ample storage for plugin libraries. Windows users should run FL Studio as administrator for plugin scans, while macOS users might need to grant permissions in System Preferences.
First, download plugins from reputable sources like Plugin Boutique or the developer’s official site to avoid malware. Free options like Vital or Helm are great starters, but paid ones like Omnisphere offer premium quality. Extract the files—VST plugins typically come as .dll (Windows) or .vst/.component (macOS) files.
Next, designate a plugin folder. FL Studio defaults to C:\Program Files\VSTPlugins on Windows or /Library/Audio/Plug-Ins/VST on macOS, but you can customize this. Organizing folders by type (e.g., “Synths,” “Effects”) prevents chaos later. Backup your FL Studio projects before installing new plugins, as incompatible ones can cause instability.
Finally, update FL Studio via the Image-Line website. Newer versions include better plugin bridging for 32-bit legacy tools. With these steps, you’re ready to proceed to adding plugins.

How to Add VST Plugins in FL Studio
Adding VST plugins is straightforward, but following precise steps ensures success. Here’s a detailed walkthrough for how to add VST plugins in FL Studio:
- Install the Plugin: After downloading, run the installer. Choose your custom VST folder during setup to keep things organized. For manual installations, copy the .dll or .vst file to your designated directory.
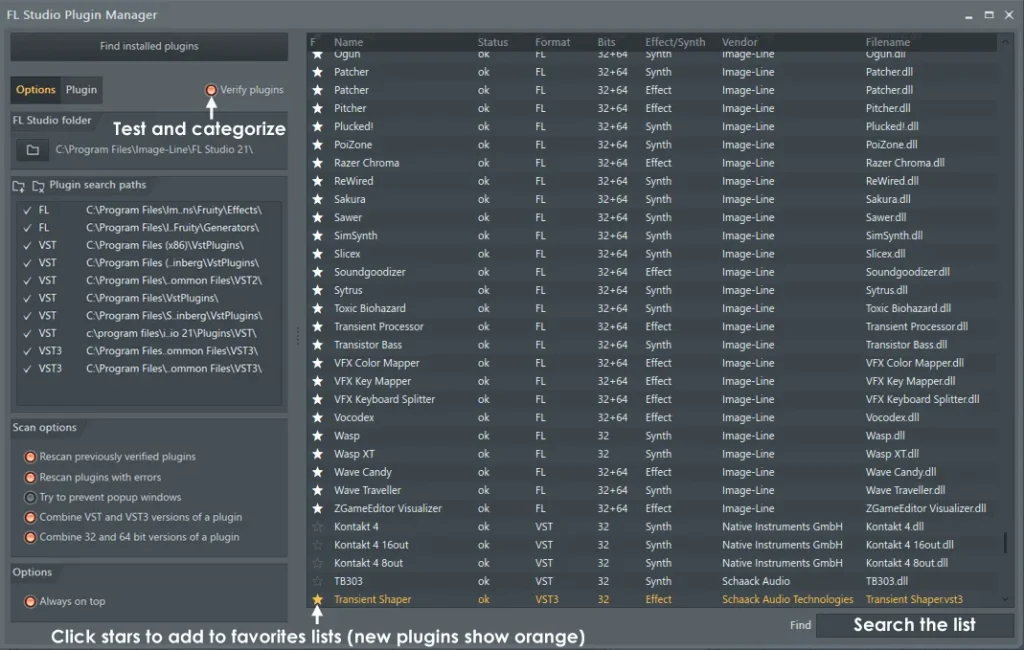
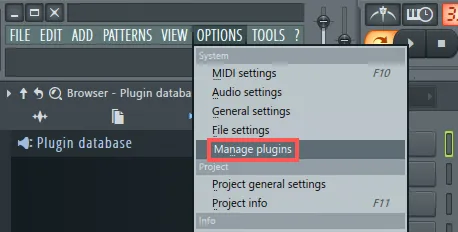
- Open FL Studio and Access Plugin Manager: Launch FL Studio and navigate to Options > Manage Plugins (or press F8). This opens the Plugin Manager, your central hub for all things VST.
- Set Plugin Search Paths: In the Plugin Manager, click “Find Plugins” or add folders manually under “Plugin search paths.” Include subfolders if your plugins are nested. FL Studio will scan these directories for compatible files.
- Scan for Plugins: Hit the “Find more plugins” button. The scan might take a few minutes, depending on your library size. During this, FL Studio verifies each plugin, marking them as “Verified” if they load correctly.
- Add to Channel Rack or Mixer: Once scanned, close the manager. In the Channel Rack, click the “+” icon and select “More plugins” to browse your list. Drag the desired VST onto a channel. For effects, insert them via the Mixer by selecting a slot and choosing from the plugin menu.
- Authorize if Needed: Some plugins require activation. Enter your serial key or use iLok for protection. FL Studio will prompt this upon first load.
Common pitfalls include forgetting to rescan after installation—always do a full rescan via Plugin Manager > Start scan. If a plugin doesn’t appear, check if it’s 32-bit; enable bridging in Options > General Settings > Miscellaneous > Bridge (32-bit plugins).
For bulk additions, use the “Fast scan” option for quicker results, but opt for thorough scans periodically. This process typically takes under 10 minutes, transforming your setup instantly.
How to Manage VST Plugins in FL Studio
Once added, effective management is vital to manage VST plugins in FL Studio. Poor organization leads to wasted time searching for tools, so implement these strategies:
- Organize with Favorites and Categories: In the Plugin Manager, tag plugins as favorites by clicking the star icon. Group them into categories like “Compressors” or “Virtual Instruments” for easy access. This customizes the browser view in the Channel Rack.
- Update and Remove Plugins: Regularly check developer sites for updates. To update, reinstall the new version and rescan. For removal, delete the file from your folder and rescan—FL Studio will purge it from the list. Use the “Installed” tab in Plugin Manager to view all plugins and their statuses.
- Handle Plugin Databases: FL Studio stores plugin data in a .fst file. If issues arise, reset the database via Plugin Manager > Options > Reset plugin list. This is useful after major updates.
- Performance Optimization: Disable unused plugins in projects to save CPU. Monitor usage with the CPU meter and use the “Wrap” feature for bridging resource-heavy plugins.
- Backup and Sync: Export your plugin database (Options > File Settings > Backup) for transfers to new computers. Cloud sync tools like Dropbox can keep folders consistent across devices.
By managing plugins proactively, you maintain a clutter-free environment, boosting productivity. Producers often overlook this, but it’s the secret to a streamlined DAW experience.
Troubleshooting Common VST Plugin Issues in FL Studio
Even with careful setup, issues can occur when trying to add and manage VST plugins in FL Studio. Here’s how to fix them:
- Plugin Not Detected: Ensure the file is in a scanned path. Run as admin and verify compatibility (VST3 preferred over VST2).
- Crashes on Load: This signals conflicts. Isolate by loading in a blank project. Update drivers or disable antivirus temporarily.
- High CPU Usage: Bridge plugins or reduce sample rates. Free tools like Plugin Doctor can diagnose problems.
- Authorization Errors: Re-enter keys or contact support. For macOS, check Gatekeeper settings.
- Missing Presets: Reinstall or point FL Studio to the correct preset folder in Plugin Manager.
If problems persist, consult FL Studio’s forums or knowledge base. Most issues stem from outdated software, so keep everything current.
Conclusion
Mastering how to add and manage VST plugins in FL Studio is a game-changer for any producer. From installation to troubleshooting, these steps ensure a seamless experience, allowing you to focus on music creation. With thousands of plugins available, the possibilities are limitless—start small, organize diligently, and watch your productions soar.
Remember, practice makes perfect. Experiment with new plugins regularly, but prioritize quality over quantity. If you’re ready to dive in, open FL Studio now and begin your VST journey. Happy producing!